What is CI/CD?
The Azure DevOps Pipelines are all about CI/CD. In short CI is the process of making sure your code builds correctly and ideally also running automated tests on the code. This way you can quickly find issues before deploying the website or application. CD is the process of automating the deployment of your stable code to any number of environments.
Azure DevOps Pipelines Documentation
Check Azure Pipelines Documentation on how to use Azure PipelinesClassic or Yaml Pipelines
There are 2 ways of creating Pipelines in Azure DevOps, that is using the Classic editor and the yaml code editor. The Classic editor has been around forever and yaml code turned up a couple of years ago, I can't remember exactly when, but suddenly it was there. Every client I've ever worked at always used the Classic editor to create Pipelines. So I'm used to that way of working. Although there's a shift to yaml and will probably take over the Classic editor, for now I haven't had the time yet to figure out yaml. We'll check that out later. Be sure to check out the difference between yaml and classic in the documentation.
Azure DevOps Yaml Documentation
Check Define Pipelines using YAML syntax on how to use yaml syntaxAzure DevOps Classic Documentation
Check Define Pipelines using the Classic interface on how to use the classic editorHow do we set it up?
There are many ways of setting up CI/CD Pipelines, there is no one way solution. It depends on a lot of criteria when it comes to a website or application, like type, size, architecture, size of the company or team etc... But that's a whole other topic to cover some day. So for the use case of my simple website, I don't want to deploy it manually anymore from within Visual Studio the way I did before.
The idea is that I can work on the website continuously and commit/push my code to the repository without having to worry about losing anything, but also not having to worry that my changes are deployed to Azure immediately. In the article Don't Klingon the past, we have Source Control, I had already created a main branch in my repository to store my code. This is the default branch when storing code in Source Control. Up till now I had been working on the main branch, committing/pushing the code to the repo, and deploying the website manually from Visual Studio using the Publish functionality. Now I'm going to use the main branch to deploy my website using the DevOps Pipelines, and I will set it up in a way that when code is being pushed to this branch, the website is deployed automatically.
Parallel timelines
I don't want to lose the flexibility of committing my code from time to time, even when I haven't finished whatever it is I'm working on. Imagine working on something for days and then all of the sudden you computer crashes or you spill coffee on it and your drive fails... I've seen it happen to someone else before. So to be able to do this I create another branch, deriving from the main branch, existing in parallel. You can call this whatever you want, but I've always used a naming convention like feature/new_top_notch_feature. It's more clear what purpose it serves in case you have multiple parallel branches.
Timelines collide
Merging back from the feature branch into it's original branch can be handled in different ways. We can merge this branch manually into main and then push the changes back to the repository. But I'm not going to do that. I'm going to use Pull Requests (PR) for that. Although PR's serve a far greater purpose than just merging, that'll be the prime reason to use it. Another advantage I find very useful is the fact that when you create a PR is that you immediately have an overview of the exact changes that you're trying to merge back. A PR can be initiated from Visual Studio or directly in DevOps.
Azure DevOps Git Documentation
Check Create Pull Requests to learn more about Pull RequestsCreating a CI Build Pipeline
Since the main branch will be my stable branch for deployment, this one needs a CI Build Pipeline. The CI Build Pipeline will make sure that when I merge my code back from the feature branches, everything still compiles and is validated when creating a Pull Request.
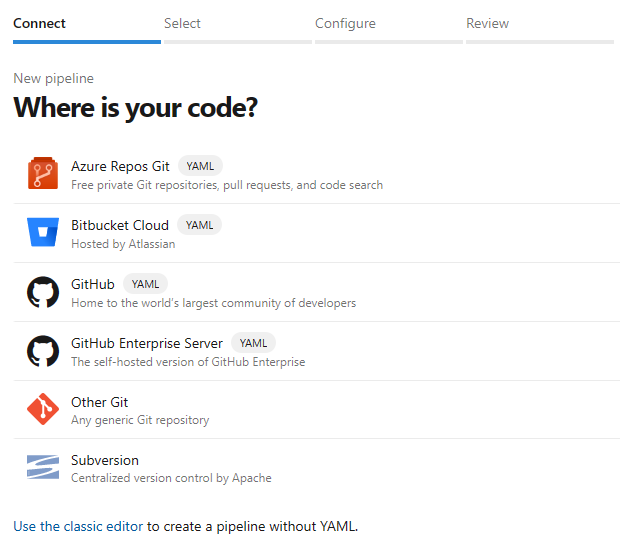
The following steps were taken:
- In DevOps, navigate to Pipelines in your project.
- Create a new pipeline by clicking New Pipeline in the top right corner of the screen.
-
At the bottom click the Use the classic editor to create a Pipeline without YAML. That's what I'll be using for now.
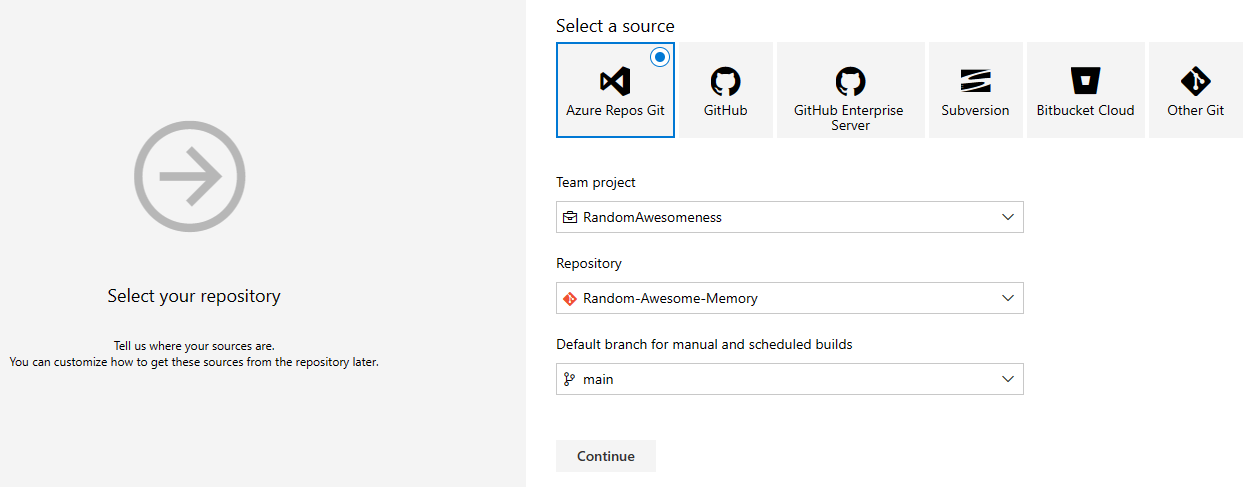
-
Select the source of your repository, I'm using Azure Repos Git. Select the Team project, Repository and default branch you're working from Click Continue to go to the next step.
- DevOps has a wide range of Featured options here. I select the template ASP.NET Core from the list by clicking the Apply button next to it.
-
When you click Pipeline just below the selected Tasks tab, you can edit the general properties of the Pipeline.
Give the Pipeline a useful name to easily identity it.
I always tend to suffix a CI Pipeline with CI or CI Build, for obvious reasons.
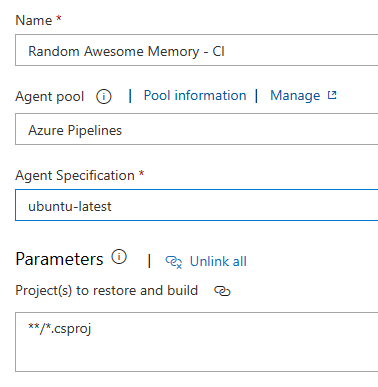
- In the Agent pool property, I select Azure Pipelines beacuase I don't have any private Agents at my disposal.
- In the Agent Specification property, I select the value ubuntu-latest to build my website.
- I leave the other properties with the default values for now.
- When you click Get Sources below Pipeline, you can see some other general properties related to the repository. I'm not going change anyhting here for now.
-
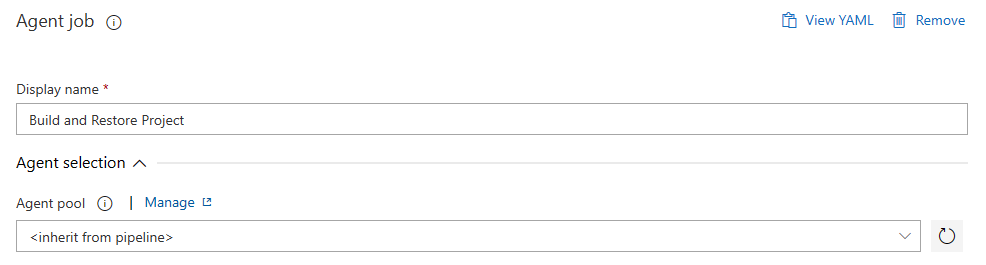
The Pipeline is organized into jobs which perform a set of sequential tasks.
There has to be at least one job in the Pipeline.
By default, one is created for you.
For now I'm just going to change the name of the job to something meaningful to identify what it does when the Pipeline runs.
-
Although this template provides a set of predefined tasks in the default job for any general .net Core project, I'm just going to use a couple of them in this Pipeline.
I just keep the Restore and Build tasks and remove the others as they are not of use to me now.
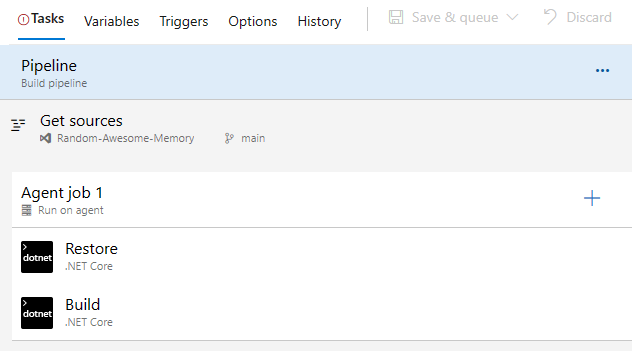
- And as the name of the tasks already clearly states, one performs the Restore of the .net Core project, and the other performs the Build of the .net Core project.
And that's it for the CI Build Pipeline for my simple website. Of course when you have a large application, there will be more tasks like running automated unit tests etc.
Azure DevOps Resource Center Documentation
Check Use continuous integration to learn more about Continuous IntegrationAzure Pipelines Agents Documentation
Check Create and manage agent pools to learn more about Pipeline AgentsAzure Pipelines Jobs Documentation
Check Jobs in Azure Pipelines to learn more about Pipeline JobsIntegrating the CI Build Pipeline in Pull Requests
Now we do need to make use of this CI Pipeline somewhere, otherwise this all would have been for nothing. I want to make sure that when I merge code back into my main branch, this is first validated using the CI Build Pipeline. And I'm going to do this using branch policies.
The following steps were taken:
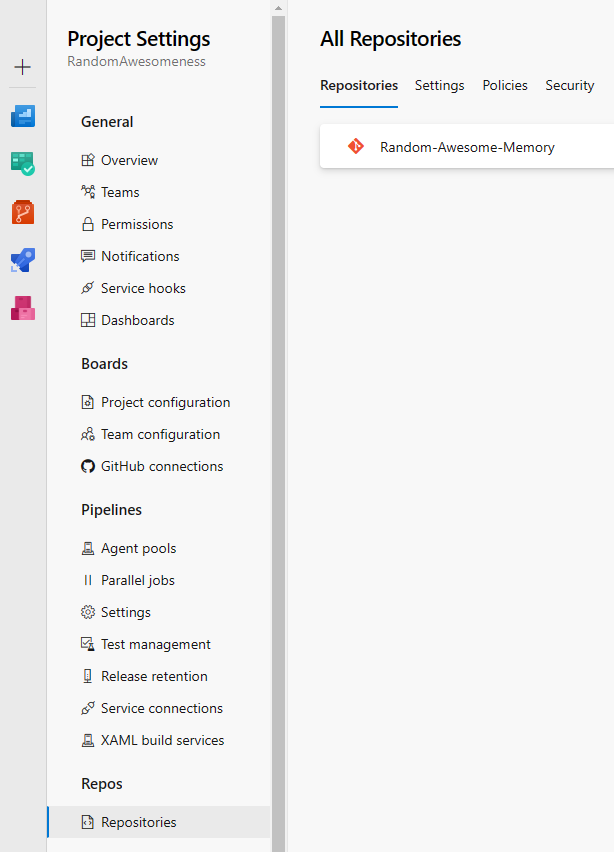
- You can find those settings in the Project Settings in the bottom left of the main menu bar when you selected a project.
-
After selecting this, you get a new menu on the left divided into sections. Click in the Repos section on Repositories. You get a list of all your repositories in the project.
-
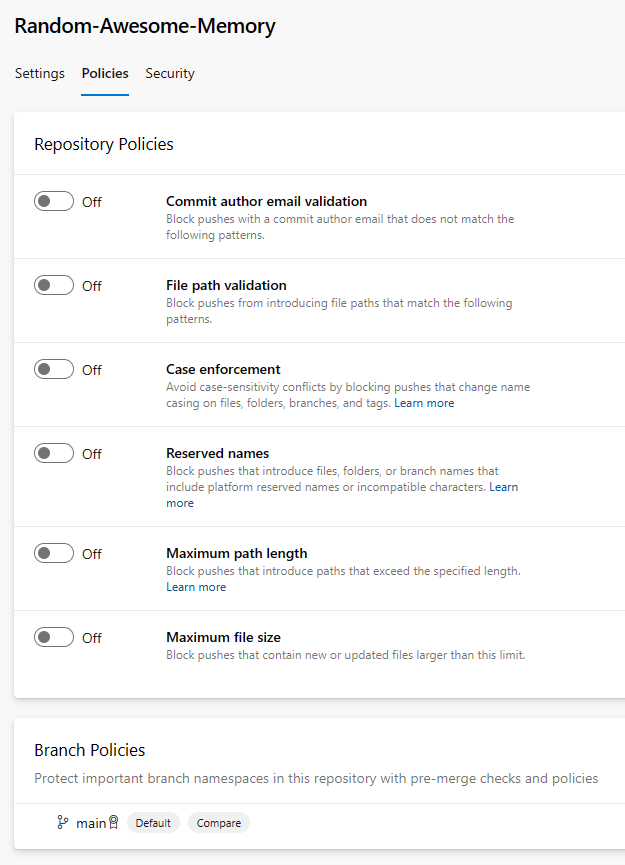
Select the one you wish to use and afterwards navigate to the Policies tab. At the bottom there's a section Branch Policies, select the main branch.
-
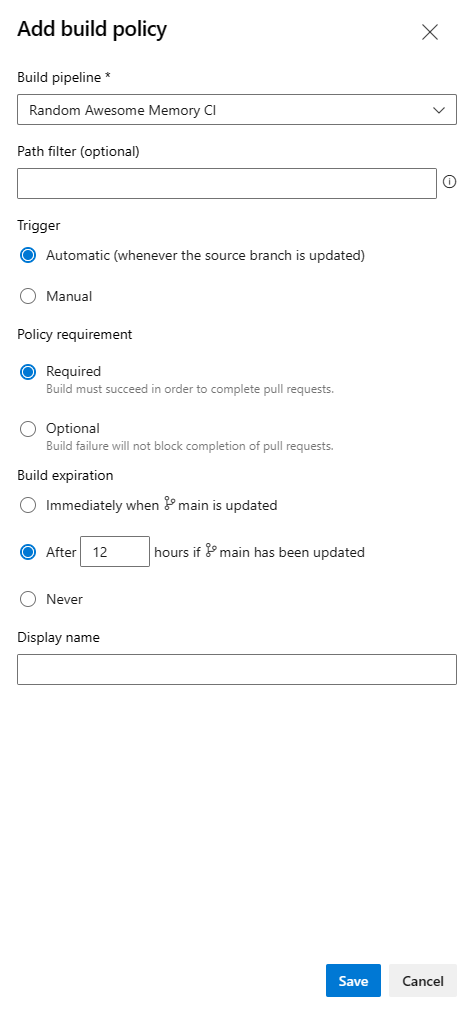
In the Branch Policies screen, I'm only interested in the Build Validation section. Add a new Build Policy buid clicking the + button.
Select the CI build Pipeline you wish to use, set the trigger to Automatic and the Policy Requirement to Required.
The rest is less important.
And save your changes.
-
Now we have a rule set up that when a user creates a Pull Request, the code is automatically validated by using the CI Build.

The Pull Request won't be able to be completed unless the CI Build succesfully validates. This is one way of ensuring your code quality. After the Pull Requests have been completed succesfully, the code is merged back to the main branch. Then we have a new stable version, or at least we should have.
Creating the CI Package / Publish Pipeline
When the main branch is updated, the idea is to package the code for deployment. Since the CI Build Pipeline just validates, we need an extra CI Package or Publish Pipeline. Depending on the way you deploy your website or application, you will choose a certain method.
For my website I'm using a Docker container to deploy. So corresponding to this method, I need to publish the container to the Docker Container Registry in Azure. I already explained in the article Migrating to Docker how to do this manually in Visual Studio. This time I'll automate this using the Pipelines.
The following steps were taken:
- Repeat the steps in the section Creating a CI Build Pipeline up till the point where you need to select a template.
- This time I select the template Docker container from the list by clicking the Apply button next to it.
- As previously described, give the Pipeline a name. In this case I tend to suffix the CI Pipeline with CI Publish.
-
The next steps are the same as before up till the definition of the jobs.
This time the predefined task is related to Docker.
At the time of writing this article, there's a Docker task version 2.* available, which I'm using.

- Clearly define a Display name for your Docker task and select the Azure Container Registry and Repository you use. In the Command section, for version 2.* there's a BuildandPush command that allows you to run the Docker Build and afterwards push it to the repository, which is an improvement to the previous version.
- Select the Docker file in your project and set the Tag that will be used to identify your image in the repository. In my case, I use $(Build.BuildNumber), which is my Build Number.
-
As a second task in the job, I use a standard Publish Build Artifacts task.
You might wonder, why do we need this?
Well, a Release in DevOps still needs a Build Artifact to be able to deploy.
This is kind of redundant
beacuase we are using a Docker image in a Container Registry instead of Packaged code.
But it's a work-around to the problem, which I hope will be resolved when using Yaml Pipelines.
So the only purpose this Artifact will have is to hold the Build Number that we need in the Release.
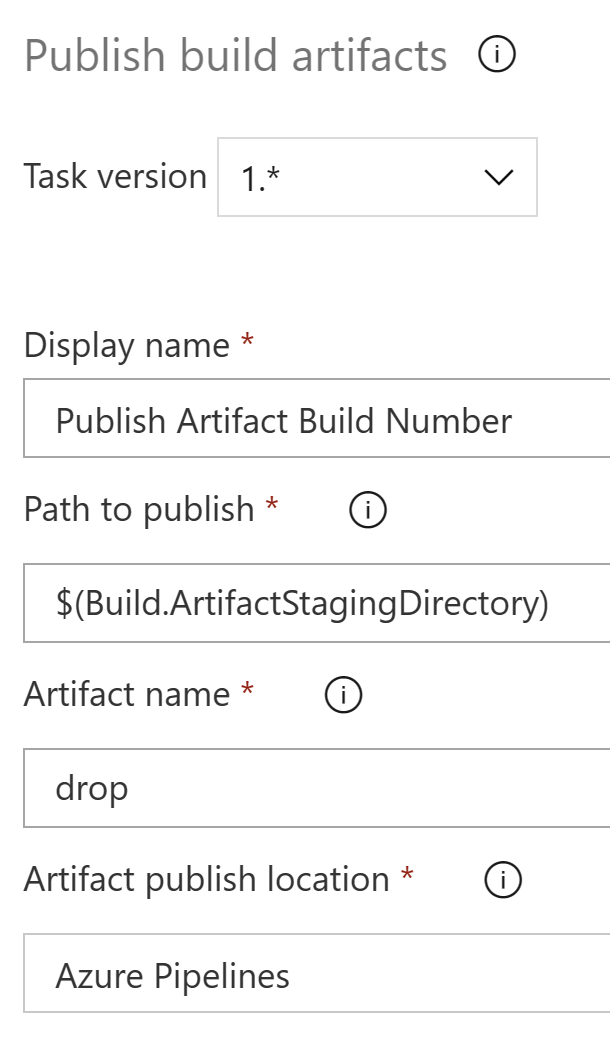
-
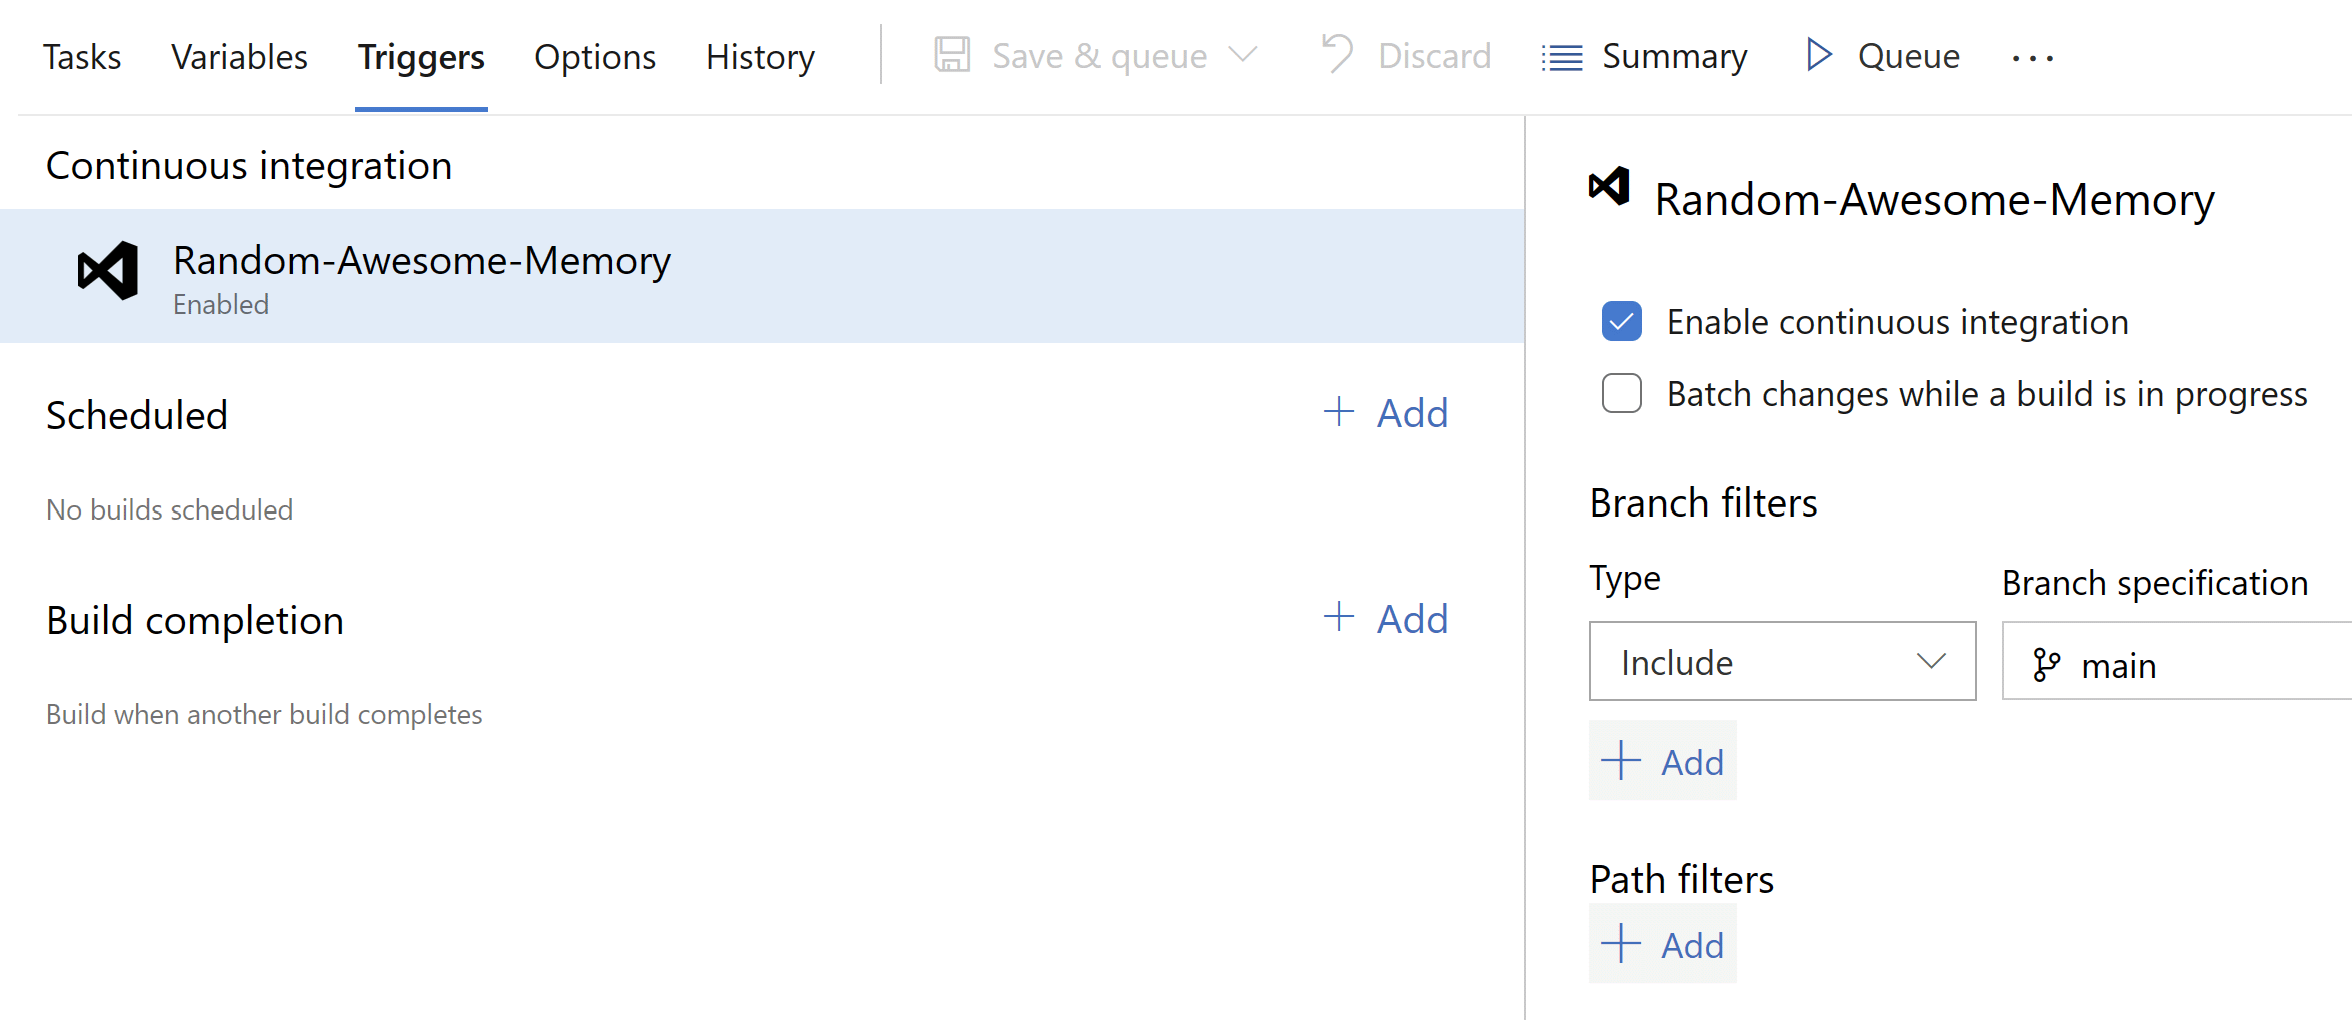
Now, one important difference with the CI Build Pipeline is that the CI Publish Pipeline has to automatically build for release when a new stable version is available on the main branch.
And that's where the Continuous Integration trigger comes into play.
Navigate to the Triggers tab and in the Continuous Integration section, check the Enable continuous integration checkbox and specify select the main branch in the Branch Filter.
This makes sure that the CI Publish Pipeline will automatically start when code is pushed to the main branch, in my case, when a Pull Request is completed.
Now that I have my CI Publish Pipeline, I'm ready to do the automated deployment through a CD Pipeline.
Creating the CD Pipeline
Since I don't have a Test or Acceptance or whatever other environment then Production, I will deploy it there so everyone can see this new version of my website. That's when the CD Pipeline comes in play. In Azure DevOps the CD Pipeline is setup through a Release, at least for the Classic editor. For the Yaml Pipelines, the release is also setup in the Pipelines section.
The following steps were taken:
- In DevOps, navigate to Releases in your project.
- Click the + New button and select the + New release Pipeline in the drop down list.
-
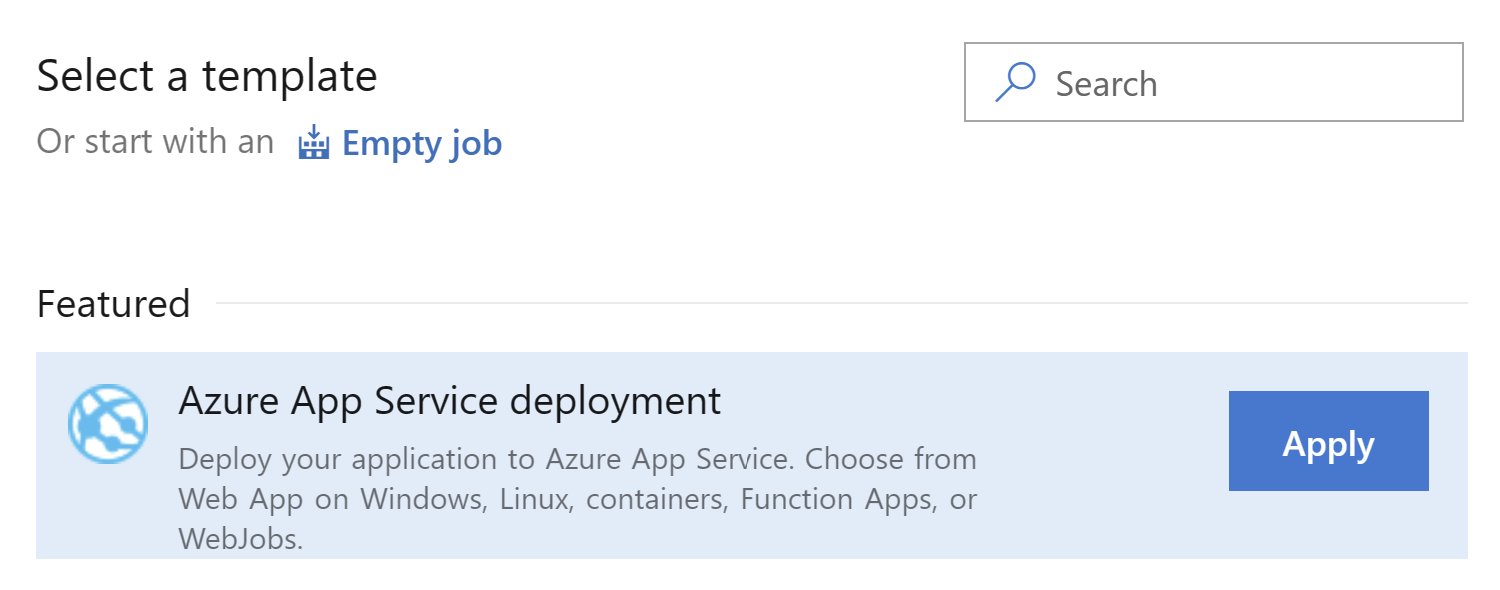
When creating a new release, you can also select a predefined template.
Look for the featured template Azure App Service deployment, select it and click Apply.
-
The first thing you see is the Stage setup screen.
A Release can consist of multiple stages for deployment, but you need a least one.
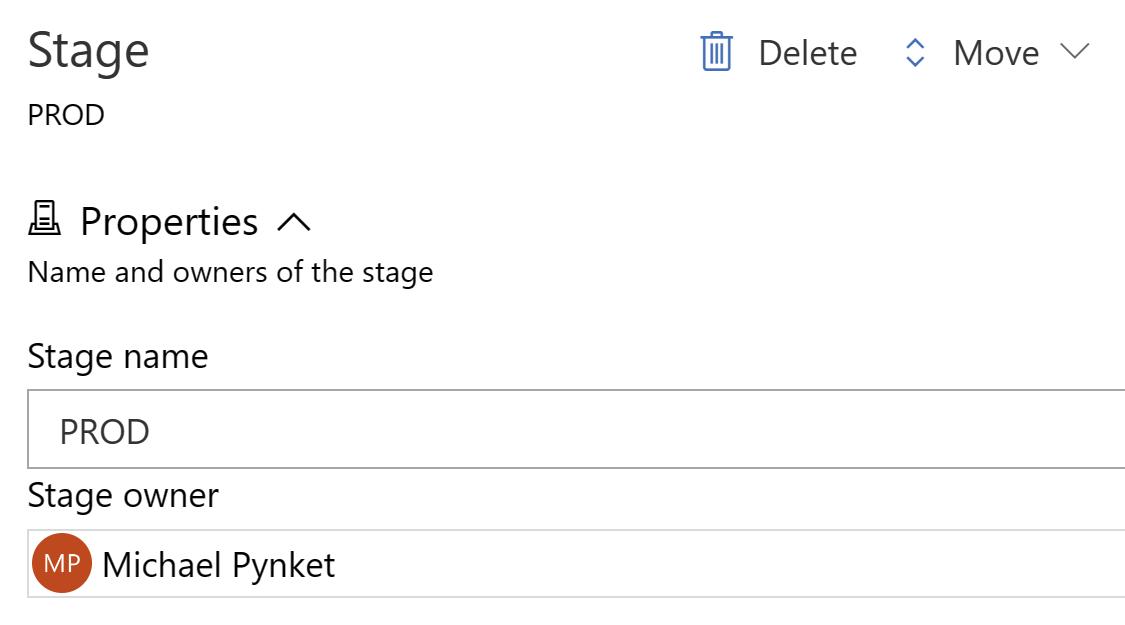
- I'm sticking with one stage and I'm calling it PROD. You can name this stage whatever you want but it should be self explanatory so it's clear what it's purpose is. Imagine having multple environments, then you can set them all up in stages. You also have the stage owner, which is the person that created the release in the first place. You can always change this to another person.
-
The next thing to do is to add an Artifact.
In case of a Docker image release, the Artifact doesn't serve much purpose other than carrying the Build Number.
But we don't have any choice
beacuase the Release doesn't work without it.
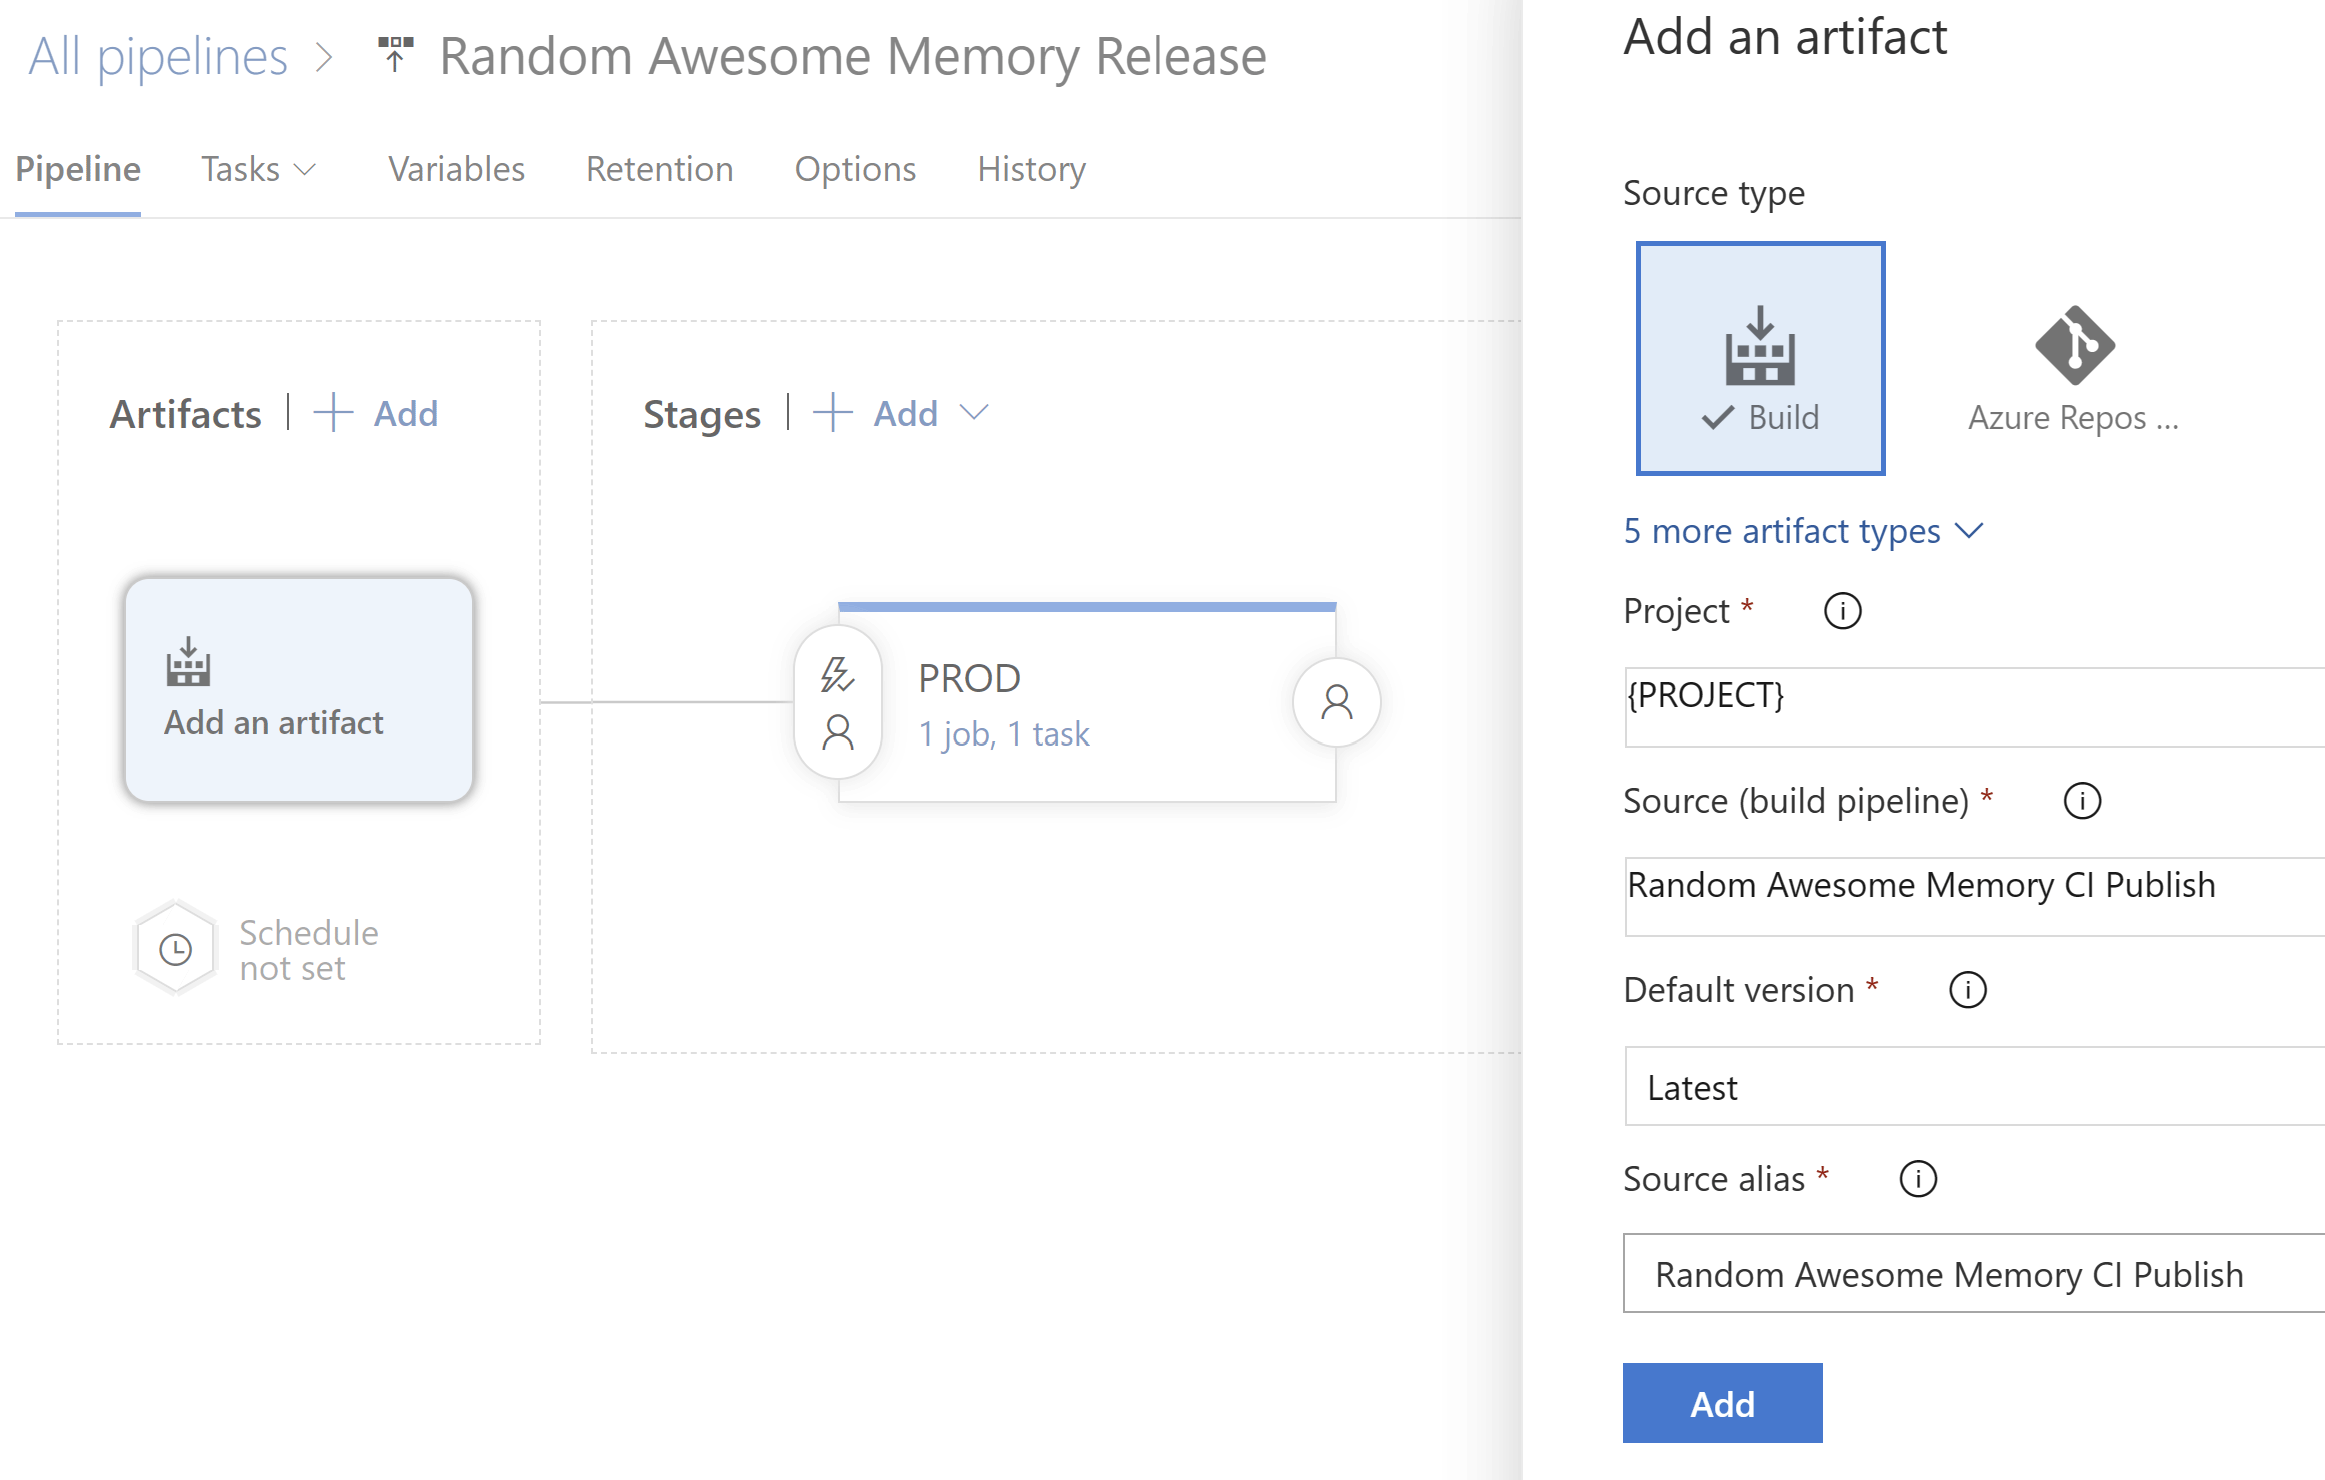
- Click Add and artifact. The source type in my case is Build. Select your project from the drop down list. The Source (build Pipeline) is the CI Publish Pipeline we setup earlier. Click 'Add' to finish up.
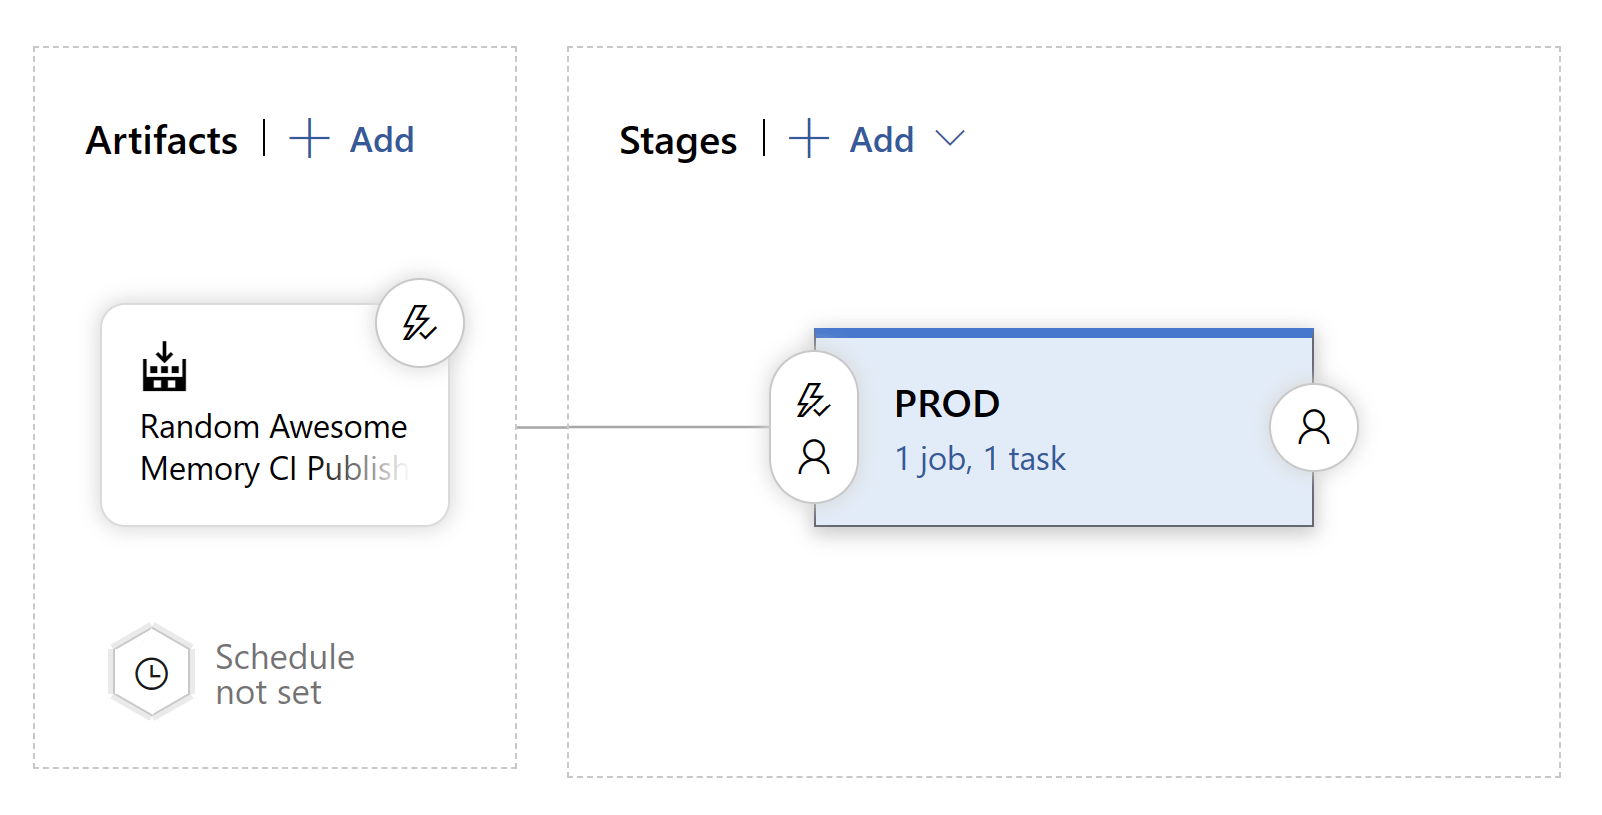
-
Now that we have the Artifact and the Stage, it's time to set up the Job in the Stage. Navigate to the Tasks tab next to Pipeline.
Or click the 1 job, 1 task hyperlink in the PROD Stage.
-
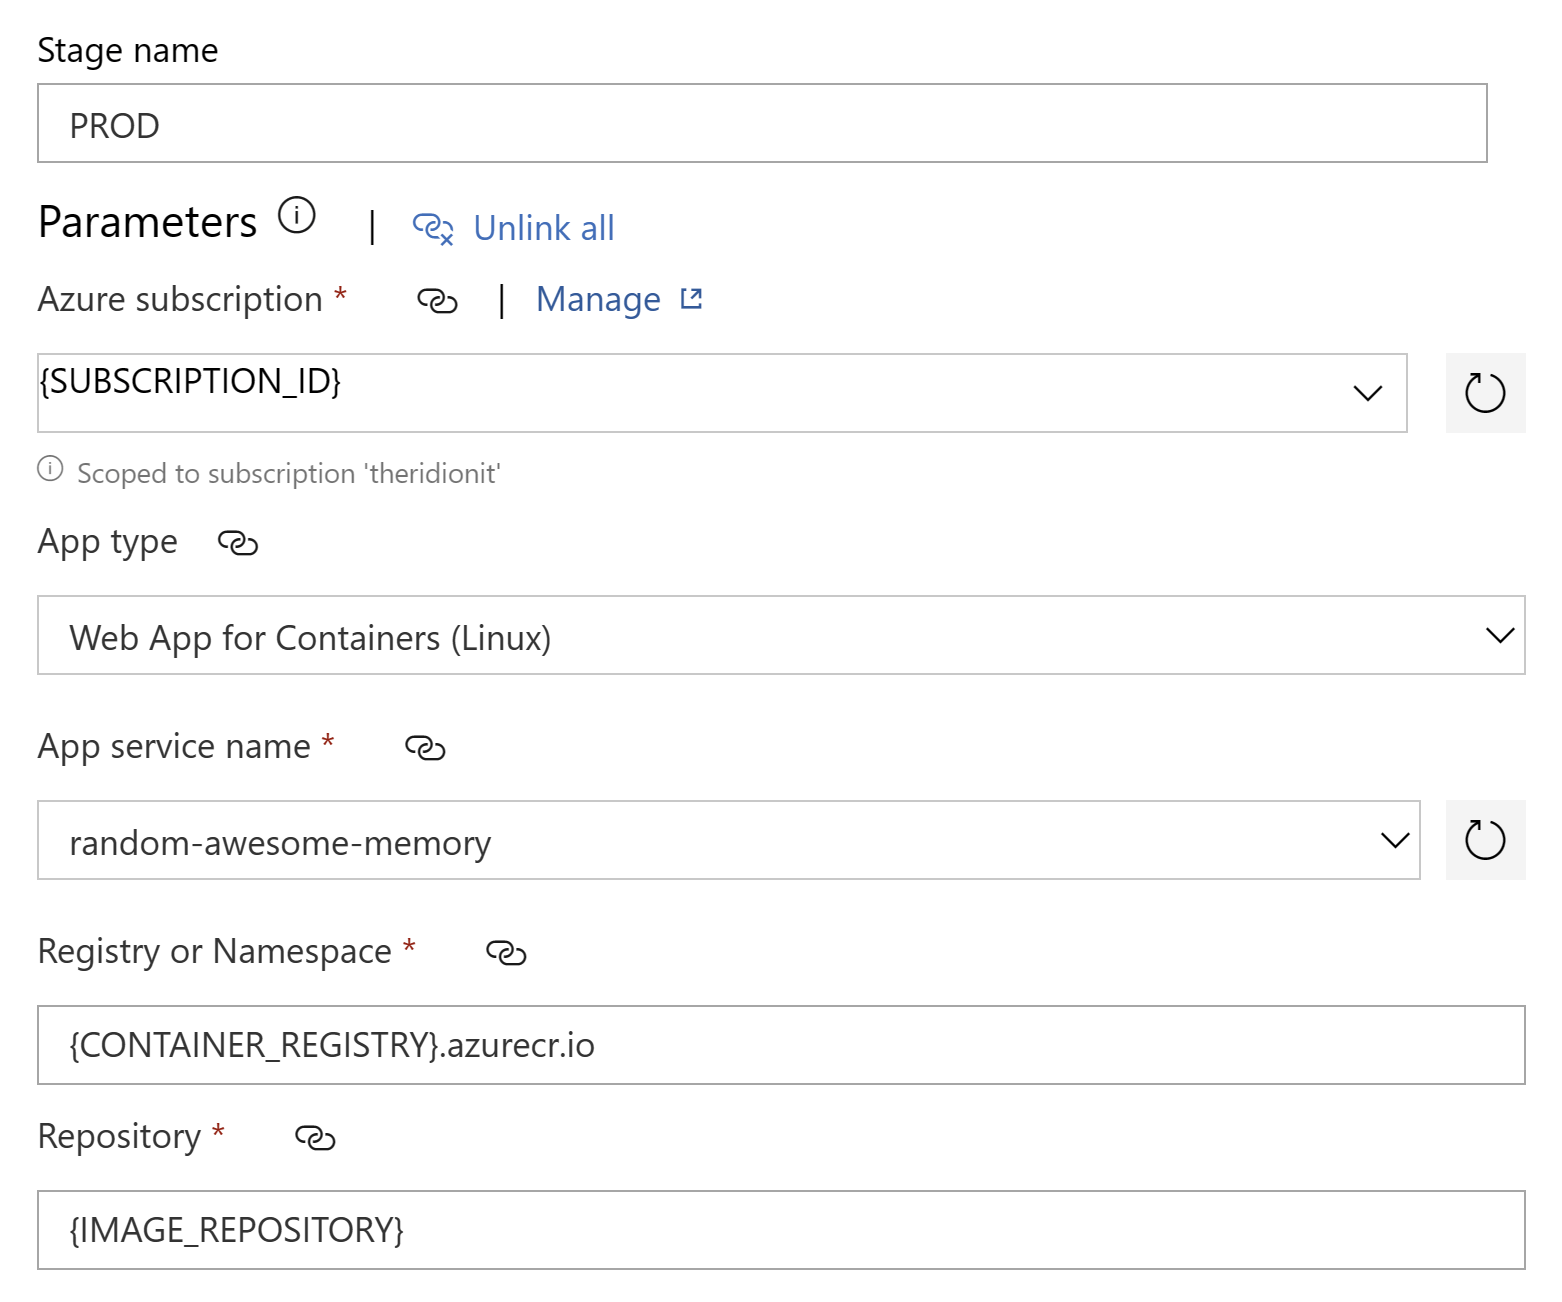
The focus is now set on the PROD Stage Deployment Process. It is important that you configure all the right parameter here required to connect to Azure.
Select your Azure Subscription from the drop down list and the App Type, which in my case is the Web App for Containers (Linux).
Then select your App Service instance from the App Service name drop down list.
Set your Azure Container Registry and Repository and you're good to go.
-
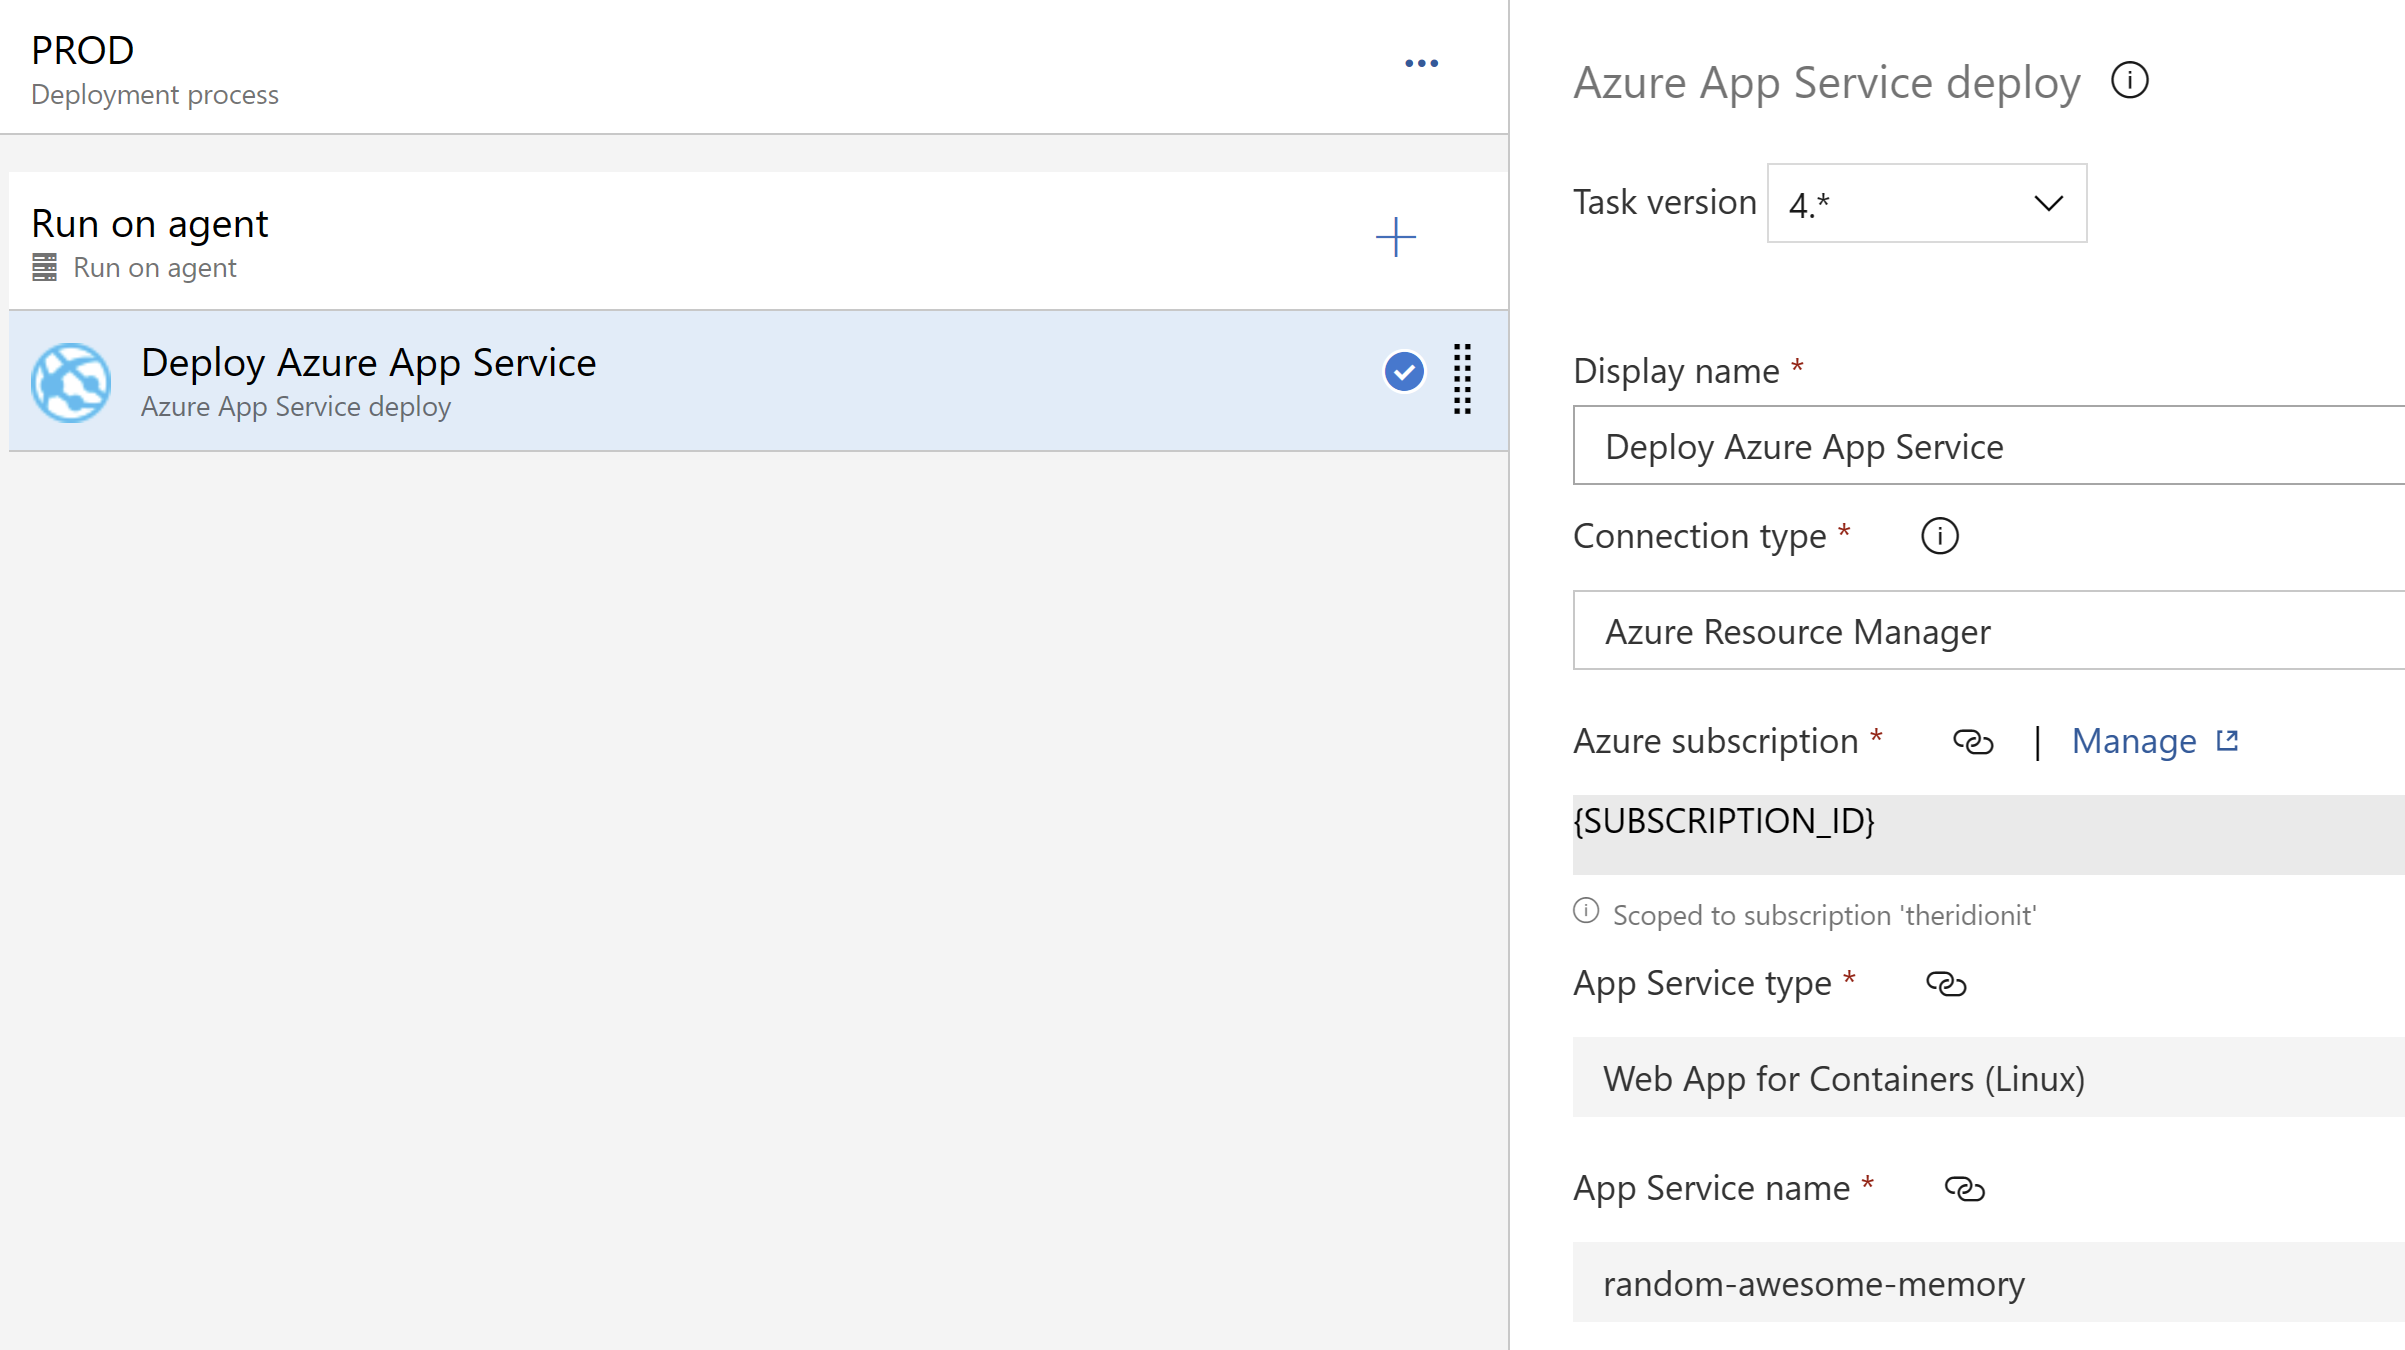
Finally, select the Azure App Service deploy task of the Job.
Some of the properties are prefilled from the Deployment Process.
Give the task a meaningfull name.
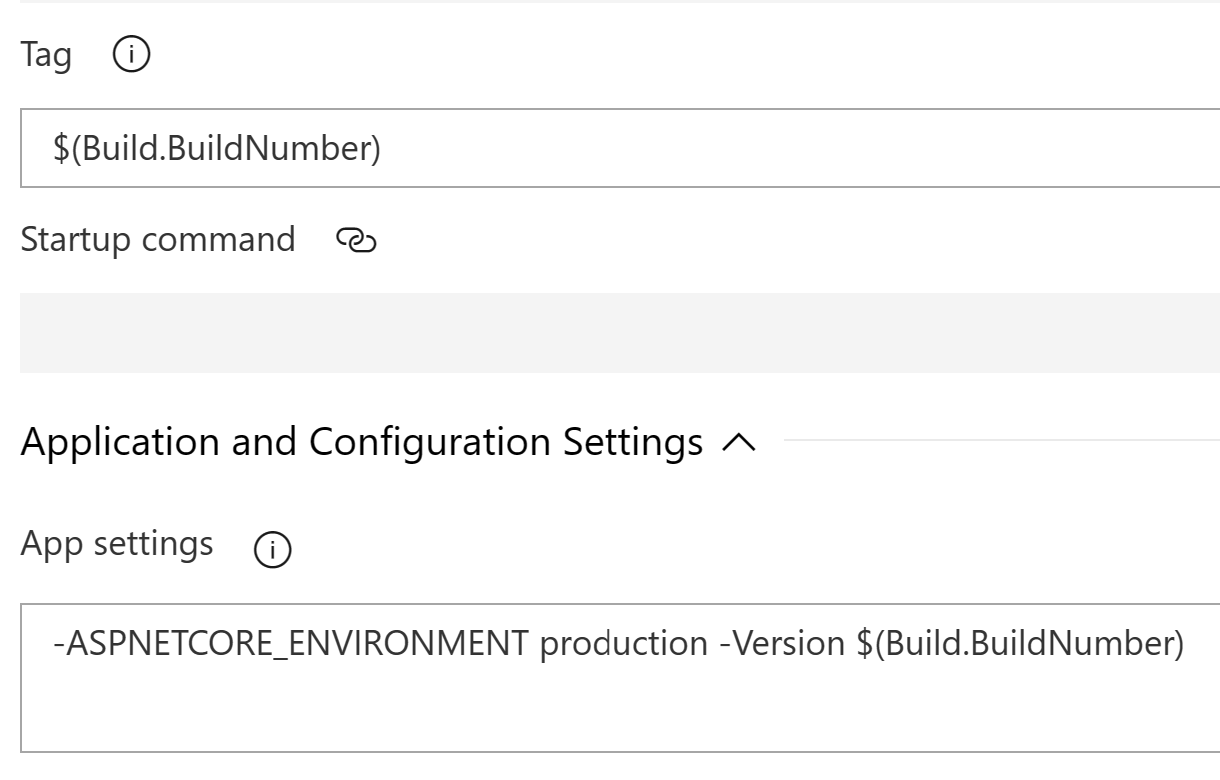
In order for the Docker Image deploy to work correctly, set the Tag property to $(Build.BuildNumber).
This is the name of the image we set in the CI Publish Pipeline, so it should be the same to be able to find it.
-
If you're working with settings files, it's always a good idea to set the environment App Setting to Production.
I always set an extra App Setting for the the Version of the application, which is the Build Number, so I can easily identify the version that was deployed.
-
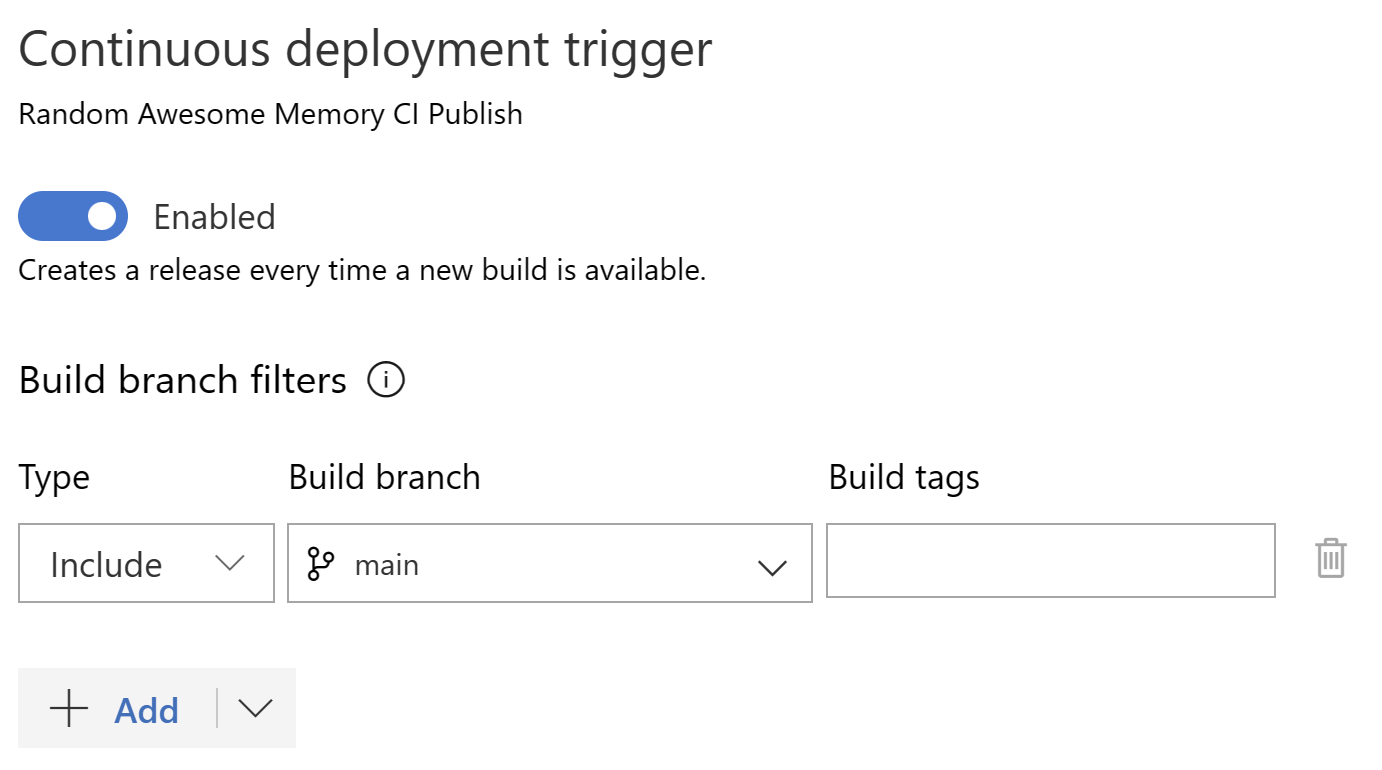
And now, last and certainly not least, I want to set a continuous deployment trigger on my release.
This means that each time a new version is build in my main branch, it will be deployed automatically using this trigger.
And voila!
Conclusion
There are so many ways and combinations of setting up CI/CD or Build and Release Pipelines, depending on many citeria. But it's very important to find a way of implementing it based on your personal or team's needs. Sometimes you just have to experiment with it to find the best solution. Whatever suits you best. These things also have the tendency to evolve over time, when your project grows or changes.
The way I set up my CI/CD Pipelines here is just how I like to do it. It might be overkill in the use case of simple website, I'm not going to argue with that. But I also wanted to show what the possibilities are without going way to far.
It is a powerfull mechanism for automating certain development and release flows. And integrated into DevOps as a whole product, to me it's the perfect fit.
Documentation Reference
- Azure DevOps Documentation - Azure DevOps Documentation
- Azure DevOps Yaml Documentation - Define Pipelines using YAML syntax
- Azure DevOps Classic Documentation - Define Pipelines using the Classic interface
- Azure DevOps Git Documentation - Create Pull Requests
- Azure DevOps Resource Center Documentation - Use continuous integration
- Azure Pipelines Agents Documentation - Create and manage agent pools
- Azure Pipelines Jobs Documentation - Jobs in Azure Pipelines